Verify a Website Works Through the WAF
The WAF is a reverse proxy server and a firewall. As such, it has features and limitations that are designed to secure and protect web servers. The WAF default settings are configured for most common situations, so in most cases the WAF would not require adjustment. However, web servers that use certain technology features may require some adjustments to default WAF settings to function properly. These include:
- Very large upload sizes (100’s of MBs)
- Very large header/cookie sizes or large number of headers/cookies
- Websockets
- HTTP/2
- Backend web servers that require Server Name Indication (SNI), such as Windows IIS with “Require Server Name Indication” enabled
- Media streaming
- Server polling
- Applications that require specific Accept-Encoding headers
- Applications that do not support HTTP 1.1 (requires separate HTTP connection for each HTTP request)
The following steps outline the best way to verify if the default WAF settings would impact an application’s functionality. You should perform the steps below once a website has been configured on the WAF (and, if needed, the SSL certificate has been uploaded to the WAF
Before permanently routing traffic to the WAF, Alert Logic recommends verifying that a website works through the WAF by temporarily re-routing traffic on your local computer to the WAF, then performing a functional validation of the website.
To verify a website:
- Identify one frontend IP that points to the WAF. The Alert Logic engineer will typically provide this information during deployment. Please contact Alert Logic support if you have any questions about the frontend IP of the WAF.
If there is a load balancer in front of the WAF (such as AWS, Azure, GCP, or an on-prem WAF with a load balancer), then the WAF’s frontend IP would be the load balancer VIP for the WAF.
If you are using an AWS load balancer (ALB, NLB, or ELB), PING the DNS name of the load balancer and use the first IP address you see. Note that you should NOT use this IP when you are routing traffic permanently to the WAF. This IP is only intended for performing this validation testing. An AWS load balancer has multiple nodes (IPs). For AWS load balancers, you should always point your DNS to the AWS load balancer’s DNS name. For more information, click Routing Traffic to the WAF.
If there is not a load balancer in front of the WAF (such as an on-prem WAF without a load balancer), then the WAF’s frontend IP would be the WAF’s VIP. - Open your /etc/hosts file in a text editor.
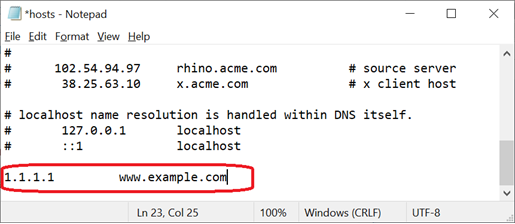
- On Windows, you need to edit the /etc/hosts file as an administrator. To do so, click the magnifying glass icon on the Windows task bar. Type “notepad”, and right-click on the “Notepad” app. Select “Run as administrator” from the menu. Inside Notepad, select File/Open and navigate to the /etc/hosts file. On most Windows systems, the /etc/hosts file is located at C:\Windows\System32\drivers\etc\hosts.
- On Linux, you typically need sudo access to edit the /etc/hosts file.
- Add a line to the bottom of the /etc/hosts file with the WAF’s frontend IP (from step 1 above) and the domain name of the website you wish to test.
- To confirm that traffic from your local computer is going through the WAF, you can request a URL that would trigger an attack signature on the WAF. Doing so would result in the WAF logging the HTTP request as a violation in its Deny Log. You can then inspect the WAF’s Deny Log to confirm that your request is going through the WAF. We highly recommend that you do this step before performing any functional validation tests to ensure that your local computer’s traffic is actually going through the WAF.
From your web browser, go to the website’s domain name, followed by this string: “/id?=%00”. For example: https://www.example.com/id?=%00
The “/id?=%00” string is a null-byte injection (passing a null value to a parameter). This will trigger an attack signature on the WAF, resulting in the WAF logging this request as a violation in its Deny Log. - In the Alert Logic console, click navigation menu (
 ) > Configure > WAF, and then click the Appliances tab.
 - In the item row of your appliance, click the appliance name.
- In the Managed WAFconsole, click Websites, and then click the desired website.
- At the website menu, click Log > Deny Log.

- On the Deny Log screen, look for the first entry that shows “/id” under URL path. The “Source IP” should be the IP address of your local computer. If you find such an entry, then you have positive confirmation that your HTTP request is passing through the WAF.

- Once you confirmed that your local computer is going through the WAF, perform a functional validation test of the website. Make sure that you go to areas of the website that use complex functions or unusual plug-ins, such as checkout, running reports, uploading files, or streaming media. The goal is to detect possible issues with the website prior to routing it through the WAF.
- Once you have completed the functional validation test, be sure you remove the changes you made to your /etc/hosts file in step 3 above.